DIY Ribbon Hair Clips
I’ve been meaning to make some hair accessories for quite a while. However, when I tried to make a bow following a YouTube tutorial, I couldn’t do it for some reason.
Then, completely out of the blue, during May Bank Holiday, I had an epiphany. And this led to a proper crafting spree!

When I needed a head bow for that afternoon tea with my Mum, I improvised by folding the waist ribbon, tying it in half with a hairband, then sticking an alligator clip on one side and a brooch on the other. It looked a lot better than I could ever have expected. So much so that it gave me an idea to try making hair bows like this – a lot easier than the traditional bow, great for a total beginner like myself!

Disclaimer: you can use hot glue gun for everything, but it can make the ribbon stiffer compared to fabric glue.
 Measure out and cut the ribbon into strips. What you’ll see pictured here later will actually be three strips of different lengths: 30cm, 20cm and 10cm. If in doubt how long you should make the longest strip, simply fold it on itself before cutting and adjust accordingly. What you have to remember is what you’ll end up with will not be as long as the strip you’ve cut because the ends will be glued together. After cutting it, gently singe off the ends to stop it from fraying, remembering to be careful when working with fire. You could also use pinking shears, if you have them, but if you don’t, lighter will do the job.
Step 2
 Glue the ends of the ribbon together, be it with fabric glue or with a hot glue gun. With fabric glue, a thin layer on the top of one end and the bottom of the other one will do just nicely. Only one end will probably be alright if you go with the hot glue gun. The latter will also stick and dry a lot quicker, but with the first one, instead of sitting around and squeezing the ends together, I put an alligator clip over it and set it aside to dry. Repeat this step with all the strips of ribbon that you have.

Step 3

 Once the glue dries, it is time to assemble. Place the ribbon loops on top of each other the way that you want, although this style and method naturally gravitate towards the largest pieces being on the bottom and the smallest ones on the top. Here is where the bobby pins come in handy: they will help in keeping the pieces together, allow you to see how they look put together and adjust accordingly to make sure they sit nice and evenly. They will also keep those pieces still in one place as you quickly sew through the middle. I actually ended up using alligator clips (again – I have a lot of those), but whatever keeps the ribbon loops in place will do. You could glue the loops together, however, I feel that pulling the thread twice through all of those is a much quicker and more efficient way of doing it.
Step 4
 Now for the middle bit. The width you’ll need will depend on the width of your smallest ribbon loop. Length-wise, simply wrap the middle of your bow round once, and remembering to keep it a little bit longer so that you can glue it together, then cut and burn off the loose threads at the ends. I needed mine quite narrow, so after doing this I covered the inside with fabric glue, folded it in half and covered in alligator clips while it dried. If you want to attach any charms to it, wait for the glue to dry before sewing anything on (this is also why fabric glue would be better than hot glue gun, it’s easier to put a needle through it).
Step 5

 And we come to the final assembly. This is where the hot glue gun definitely comes in. Attach the middle bit starting with the front of your bow – it helps if you kept it on the bow for a little bit, holding it together with a bobby pin or an alligator clip, as it will give that part its shape. Then glue the back, remembering to cover the thread, and after that’s dried a little proceed to gluing on your alligator clip/brooch fastening/whatever it is you’ll be attaching the finished bow to.


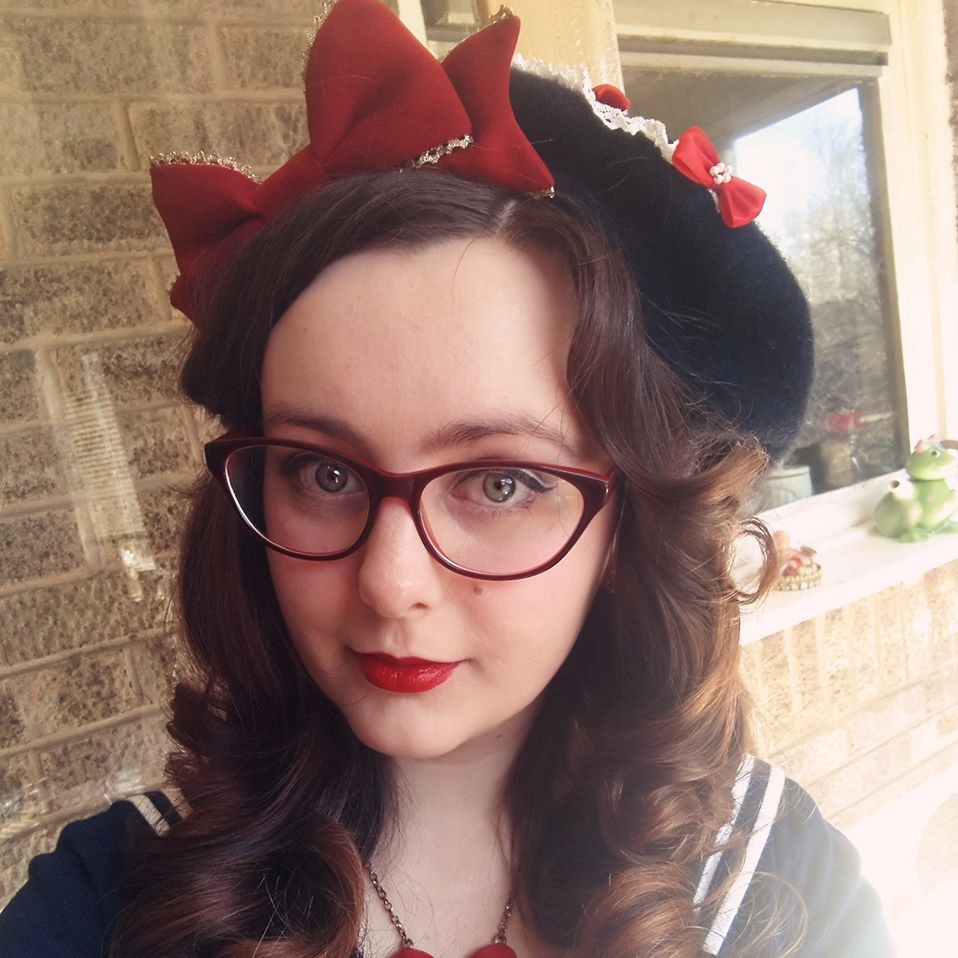
The three layer one actually turned out to be a bit too big for a pair, but I think one would work nice as a little headbow. However, since I started this project I made two other kinds, one that’s the same style but only two layer, and one closer to the original improvised bow, using a few layers of ribbon loops in the same length. I’m also considering making something using this method with ribbons of different widths as well. It might not be the classic Lolita bow, but it’s still cute, with a hint of classic. Other than the cherry ones, I deliberately left the other ones plain so that I could attach and change fancy brooches as I feel.
Overall, I’m pleased with how they’ve come out, and other than the fact that I bought a glue gun specifically for this project, it’s a very cheap thing to make.
Total cost of making: I can’t actually remember how much ribbon I bought. Assuming that it was 2m (which I know it wasn’t, but since I already used that guideline measurement earlier), a pair comes up to about £1! The ribbon cost me £0.70 per metre, and I bought a pack of 10 alligator clips with postage cost me £1.74. Unless you splash on the ribbon or fancy extra bits, none of the elements are expensive, which is what makes this project even better for beginner craft projects.
Let me know, what you think. And if you know of any easy tutorials (preferably in video form) for making/tying the classic bows, share them with me, please, I’d love to have a go!
Then, completely out of the blue, during May Bank Holiday, I had an epiphany. And this led to a proper crafting spree!

When I needed a head bow for that afternoon tea with my Mum, I improvised by folding the waist ribbon, tying it in half with a hairband, then sticking an alligator clip on one side and a brooch on the other. It looked a lot better than I could ever have expected. So much so that it gave me an idea to try making hair bows like this – a lot easier than the traditional bow, great for a total beginner like myself!
Things you will need

- Ribbon in the colour of your choice, depending on needs, but 2m should be fine for two pairs or so
- Ruler
- Scissors
- Needle
- Thread (doesn’t matter if the colour matches the ribbon)
- Lighter
- Alligator clips (or whatever you’d like to attach the bow to)
- Bobby pins
- Fabric glue
- Hot glue gun and glue sticks
Disclaimer: you can use hot glue gun for everything, but it can make the ribbon stiffer compared to fabric glue.
Instructions
Step 1 Measure out and cut the ribbon into strips. What you’ll see pictured here later will actually be three strips of different lengths: 30cm, 20cm and 10cm. If in doubt how long you should make the longest strip, simply fold it on itself before cutting and adjust accordingly. What you have to remember is what you’ll end up with will not be as long as the strip you’ve cut because the ends will be glued together. After cutting it, gently singe off the ends to stop it from fraying, remembering to be careful when working with fire. You could also use pinking shears, if you have them, but if you don’t, lighter will do the job.
Step 2
 Glue the ends of the ribbon together, be it with fabric glue or with a hot glue gun. With fabric glue, a thin layer on the top of one end and the bottom of the other one will do just nicely. Only one end will probably be alright if you go with the hot glue gun. The latter will also stick and dry a lot quicker, but with the first one, instead of sitting around and squeezing the ends together, I put an alligator clip over it and set it aside to dry. Repeat this step with all the strips of ribbon that you have.
Step 3

 Once the glue dries, it is time to assemble. Place the ribbon loops on top of each other the way that you want, although this style and method naturally gravitate towards the largest pieces being on the bottom and the smallest ones on the top. Here is where the bobby pins come in handy: they will help in keeping the pieces together, allow you to see how they look put together and adjust accordingly to make sure they sit nice and evenly. They will also keep those pieces still in one place as you quickly sew through the middle. I actually ended up using alligator clips (again – I have a lot of those), but whatever keeps the ribbon loops in place will do. You could glue the loops together, however, I feel that pulling the thread twice through all of those is a much quicker and more efficient way of doing it.
Step 4
 Now for the middle bit. The width you’ll need will depend on the width of your smallest ribbon loop. Length-wise, simply wrap the middle of your bow round once, and remembering to keep it a little bit longer so that you can glue it together, then cut and burn off the loose threads at the ends. I needed mine quite narrow, so after doing this I covered the inside with fabric glue, folded it in half and covered in alligator clips while it dried. If you want to attach any charms to it, wait for the glue to dry before sewing anything on (this is also why fabric glue would be better than hot glue gun, it’s easier to put a needle through it).
Step 5

 And we come to the final assembly. This is where the hot glue gun definitely comes in. Attach the middle bit starting with the front of your bow – it helps if you kept it on the bow for a little bit, holding it together with a bobby pin or an alligator clip, as it will give that part its shape. Then glue the back, remembering to cover the thread, and after that’s dried a little proceed to gluing on your alligator clip/brooch fastening/whatever it is you’ll be attaching the finished bow to.
Finished product


The three layer one actually turned out to be a bit too big for a pair, but I think one would work nice as a little headbow. However, since I started this project I made two other kinds, one that’s the same style but only two layer, and one closer to the original improvised bow, using a few layers of ribbon loops in the same length. I’m also considering making something using this method with ribbons of different widths as well. It might not be the classic Lolita bow, but it’s still cute, with a hint of classic. Other than the cherry ones, I deliberately left the other ones plain so that I could attach and change fancy brooches as I feel.
Overall, I’m pleased with how they’ve come out, and other than the fact that I bought a glue gun specifically for this project, it’s a very cheap thing to make.
Total cost of making: I can’t actually remember how much ribbon I bought. Assuming that it was 2m (which I know it wasn’t, but since I already used that guideline measurement earlier), a pair comes up to about £1! The ribbon cost me £0.70 per metre, and I bought a pack of 10 alligator clips with postage cost me £1.74. Unless you splash on the ribbon or fancy extra bits, none of the elements are expensive, which is what makes this project even better for beginner craft projects.
Let me know, what you think. And if you know of any easy tutorials (preferably in video form) for making/tying the classic bows, share them with me, please, I’d love to have a go!


No comments: